Package Dropbox as a Win32 app to deploy it using Microsoft’s Intune
Dropbox is a widely adopted platform to save and share your documents. Although Microsoft’s OneDrive may be the most logical choose when using Microsoft products there still are companies actively using Dropbox as their cloud file storage solution. In this blog I will share how to deploy the Dropbox client in your organization by using Intune. This is what you need:
On your PC create a new folder. The folder will contain three files: The Dropbox installer you downloaded and you create 2 additional files, an install.cmd and an uninstall.cmd file.
For the install.cmd you use the following lines:
@ECHO OFF
PUSHD "%~dp0"
"Dropbox 139.4.4896 Offline Installer.exe" /NOLAUNCH
You can validate the command by running the install.cmd as an admin.
For the uninstall.cmd file you use the following lines:
@ECHO OFF
"%PROGRAMFILES(x86)%\Dropbox\Client\DropboxUninstaller.exe" /S
Also on your machine take a look in the registry which version is installed. Apparently the version that the installer states is different than what is found in the registry. You can check the version in Computer\HKEY_LOCAL_MACHINE\SOFTWARE\WOW6432Node\Dropbox\Client
Now that you have prepared the files its time to wrap them into a intunewin file.
Source folder: specify the files which contains your installation files
Setup file: is the Dropbox offline installer files
Output folder: a folder where you want to save the intunewin file. Choose a different location than your source folder
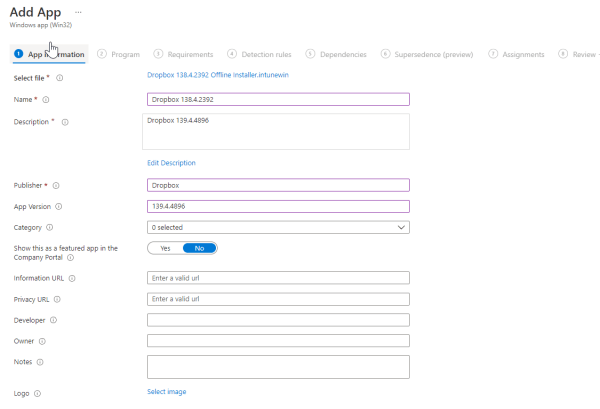
Choose Add and for App type Windows app (Win32). For package file select your Dropbox intunewin file. Fill out the required app information and choose next.
At the second step for the install command enter install.cmd and for the uninstall command choose uninstall.cmd. The install behavior should be set to System.
At the requirements choose the system architecture and a minimal operating system version. The fourth step is the detection rules. For Rules format choose Manually configure detection rules:
Deploy the Zoom client and the Zoom Outlook plugin using the Win32 app format in Intune
In this article I will show you how to can deploy Zoom as a Win32 app using Microsoft’s Intune. When following the guidelines from Zoom, they only show you how to deploy Zoom by using the Line-Of-Business method. Although this works you get much greater flexibility when deploying Zoom as a Win32 app. You can make use of delivery optimalization and better targeting to for example only 64-bit operating systems and more. Furthermore, when you want to deploy new clients via Autopilot you cannot mix line-of-business installations with Win32 app installations. So I would always be my recommendation to use the Win32 app deployment.
Personally I always like to work with and install.cmd and a uninstall.cmd to deploy my applications. You can however just repackage the msi installer and use the commands in the installation parameters in Intune. When using the install.cmd and uninstall.cmd files I can be more flexible when I need to copy files for example.
Copy the ZoomInstallerFull.msi to an empty folder. Create two new files in the folder named install.cmd and uninstall.cmd. The Zoom msi comes with a variety of installation parameters to customize your deployment as needed. You can for example disable auto update and to configure the required firewall ports. You can also use zConfig to set configurations that cannot be changed or use ZRecommend to make settings users can change. In my example I use the following installation command, which is the command in the install.cmd file:
You can test your install.cmd by running it as an administrator. For the uninstall.cmd you use the following command:
msiexec /x {51AFD52B-0614-4100-91E0-204AC1EF0A3B}
You can find the GUID for the application in the registry HKEY_LOCAL_MACHINE\SOFTWARE\WOW6432Node\Microsoft\Windows\CurrentVersion\Uninstall\{51AFD52B-0614-4100-91E0-204AC1EF0A3B}
You now should have a folder containing ZoomInstallerFull.msi, install.cmd and uninstall.cmd.
Zoom installation folder
Start the Win32 Packaging tool and enter the following parameters:
The location of your source folder containing the ZoomInstallerFull.msi, install.cmd and uninstall.cmd.
The setup file is ZoomInstallerFull.msi
Create a new output folder where you want to save the new package.
Select no for creating a catalog folder
Zoom Win32 packaging parameters
To deploy the application with Intune go ahead and add a new application and for app type choose Windows app (Win32)
On the App information page, provide the Naam, Publisher, app Version and whatever information you want to share. At the program page use install.cmd for the installation command and uninstall.cmd for the uninstall command. For install behavior make sure to select system. Finally select No specific action for device restart behavior.
Zoom installation parameters on Intune
At the Detection rule page I like to use the version number to detect if the application is installed. I you want to deploy an other version in the future you can use the Supersedence option which makes detecting on a specific version easier. So fo the Detection rules choose Manually configure detection rules:
Value: 5.9.2481 (or whatever version you are deploying)
Zoom detection rules Intune
Finally deploy the application to a group in your organization.
To install the Zoom plugin for Microsoft Outlook you can use the same procedure. Create a folder which contains: ZoomOutlookPluginSetup.msi, install.cmd and uninstall.cmd.
Use Intune to deploy an up to date version of Adobe Acrobat Reader DC using the Win32 app deployment.
One of the first applications that is put on the list to distribute with Intune is Acrobat Reader DC. There are several blogs that describe how to do this, however they all use the default Adobe Acrobat Reader DC Distribution executable. Only installing this executable will get you the 2015 version 2015.07.20033, which is by now (2021) extremely out dated. This article will focus on how to deploy an up to date version of Adobe.
First you still need the default Adobe Acrobat Reader DC Distribution executable, which you can download from https://get.adobe.com/uk/reader/enterprise/ . Select your required operating system, language and version. Once you have downloaded the exe you will need to extract the contents of the exe. You do this by adding the following switches after the exe. Specify your own output location.
Place the download update in the same folder where you extracted the content of the executable. In the same folder you create two files. The first is named install.cmd and the second is called uninstall.cmd
Here its important that you reference the correct update file which in this case is AcroRdrDCUpd2100720091.msp.
You can use the Adobe Customization Wizard DC to further customize your Adobe installation . This will generate the mst file which is also referenced in the install.cmd file. I wont to in to detail, there are plenty of blogs which will explain this.
The contents of the uninstall.cmd file is
msiexec /x "%~dp0AcroRead.msi" /q
The content of your Adobe folder should look quite similar like this:
Test you installation by running the install.cmd and the uninstall.cmd files before continuing to the next steps.
Source folder: Is the location where all the Adobe files are located
Setup file: in this case it’s setup.exe
Output folder: location where the intunewin file is saved
Catalog folder: choose no
When you have your .intunewin file you can upload this to Intune and start deploying it. I won’t go in to detail but some points to take in to account:
At Program:
Install command: install.cmd
Uninstall command: uninstall.cmd
At Detection Rules use:
Manually configure detection rules and use the Registry Rule type:
HOW TO: deploy Win32 application using Endpoint Manager.
With Endpoint Manger you can deploy a variety of different applications to Windows clients. I have made blog posts about using MSIX packages to provide a modern way to distribute applications. Sometimes MSIX might not be the right solution for you. This blog is about deploying Win32 applications using the Windows App (Win32) capabilities. This form of distributing gives you a lot of control on how and when an application should be installed.
A note of caution, if you start to use Windows App (Win32) app deployment for your environment it is highly recommended that you do not combine Windows App (Win32) with Line-of-Buisiness app installations. Especially if you are planning to use Microsoft Autopilot, the combination of Win32 apps and Line-of-Business apps will cause installations to fail. So, if you decide to use Windows App (Win32), use it for all your applications.
Before you can upload a Win32 application to Endpoint Manager you will need to prepare the application. Essentially you repackage the application and all the dependent files into an .IntuneWin package, which can then be uploaded to Endpoint Manger. To package an application you will need to download the Win32 Content Prep Tool from GitHub.
You will then need to gather all required media to install the application and place them into one folder. I have created two examples, one for .exe applications and one for .msi application. For both types of installations, it is recommended to create two batch files, one for installation and one for the uninstallation. This will provide better control when deploying the application.
For the Citrix Workspace, which is an .exe I have created the following batch files: install.cmd and uninstall.cmd and placed them in a folder togheter with the exe installation file.
Install.cmd:
@ECHO OFF
PUSHD "%~dp0"
"CitrixWorkspaceApp.exe" /silent /noreboot /forceinstall
uninstall.cmd
@ECHO OFF
PUSHD "%~dp0"
"CitrixWorkspaceApp.exe" /silent /uninstall
Citrix Workspace package content
For Acrobat Reader, which is an .msi I have also created the following batch files: install.cmd and uninstall.cmd. These files are added to the installation files.
Once you have gathered all the necessary installation media and you have validated that your batch files are working, by running the install.cmd and uninstall.cmd files you are ready to package. To package the applications run IntuneWinAppUtil.exe from an elevated PowerShell prompt. You are prompted for the source folder, which is the folder that contains all the installation files. The setup file is the actual executable and you need to specify an output folder where the .IntuneWin file will be saved. At this point we do not need a Catalog folder. After the Utillity is ready you will end up with an .IntuneWin file.
Endpoint Manager
Now its time to distribute the application using Endpoint Manger. Login to endpoint.microsoft.com and select Apps and all Apps to Add a new application. Make sure to choose Windows app (Win32) as an app type. The first step is to select your .IntuneWin file and to provide information about the application. I will first start with Citrix Workspace and then add Acrobat Reader.
Application information
The second step specifies how to install the application. For the install and uninstall commands you will need to enter the batch files you created in the beginning. In my case the Install command is install.cmd and the uninstall command is uninstall.cmd. For installation behavior you can choose between system and user. This will determine where the application will be installed, either in the system context or in the user profile, this depends on your application.
Application installation controls
Choosing a restart behavior after the application is installed. Of course, this all depends on your application and whether it requires a reboot. Depending on your needs the following actions are explained:
Determine behavior based on return codes – The device will restart bases on the configured return code. No specific action – Will suppress a restart during the installation of Win32 apps. App install may force a device restart – This option means that the Win32 app installation can complete without suppressing restarts. With this configuration a Hard reboot return code will notify the user that a restart of the device will be triggered in 120 minutes. A Soft reboot return code will notify the user that a restart is required to finish the installation. Intune will force a mandatory device restart – After a successful Win32 app installation the device will be rebooted immediately with no notification.
You get several default return codes. In most cases these return codes will work for you application . . The code configures the post-installation behavior of the Win32 app. If your application uses different access codes, you can use them here. The actions are explained:
Failed – The Failed return code indicates that the Win32 app installation failed. Hard reboot – The Hard reboot return code indicates that the device is required to restart to complete the installation. Additional Win32 apps cannot be installed on the device without restart. The user will be notified about the required restart. Soft reboot – The Soft reboot return code indicates that the next Win32 app can be installed without requiring a restart, but a restart is necessary to complete the installation of the installed Win32 app. The user will be notified about the restart. Retry – The Retry return code indicates that the Win32 app installation is retried three times. The installation will wait for 5 minutes between each attempt. Success – The Success return code indicates the Win32 app installation was successful.
The third step in the process is to specify the requirements. For the most part these are self-explanatory. You can however use custom requirement types such as specific files, registry settings or even scripts to determine whether an application should be installed or not. I will not be going into detail in this blog. For now, I only choose to install on 64-bit machines with a minimum operating system of Windows 10 1903.
Installation requirements
The fourth step are the detection rules. The detection rules are used to check if the application is present on the device. If the rules are not met Endpoint Manager will try to install the application on the device.
For .exe installations you might decide to just validate if the application is present. In my case I just check if SelfService.exe is present, in the path C:\Program Files (x86)\Citrix\ICA Client\SelfServicePlugin\.
EXE Application detection rule
The fifth step is to create dependency rules. Software dependencies are applications that must be installed before this application can be installed. Specifically, the device must install the dependent apps before it installs the Win32 app. You can add Win32 app dependencies only after your Win32 app has been added and uploaded to Intune. After your Win32 app has been added, you will see the Dependencies option on the pane for your Win32 app. Any Win32 app dependency needs to also be a Win32 app. It does not support depending on other app types, such as single MSI LOB apps or Microsoft Store apps.
Since this is the first Win 32 app there is no option to create any dependencies. After Citrix Workspace is added a dependency will be created with Acrobat Reader. So, I just select next and I assign the application to a user group, as required.
For Acrobat Reader the steps are the same with a few exceptions. For the detection rules I will use a MSI rule type instead of a file location. Normally the MSI product code is filled in automatically. If this is not the case, you can check your registry settings. For 64-bit machines browse to HKLM\SOFTWARE\WOW6432Node\Microsoft\Windows\CurrentVersion\Uninstall. Here you will find an overview of all the installed applications. In my case for Acrobat Reader I can find the MSI GUID.
MSI application detection rule
Find the MSI GUID in the Registry settings
Since Citrix Workspace has been added to Endpoint Manger this can be used as a dependency. Acrobat Reader and Citrix are do not require each other to function, this is purely for demonstration purposes. To add a dependency simply select to add a dependency and select the application, in this case CitrixWorkspace.exe. By creating dependencies means that before Acrobat Reader is installed the Citrix Workspace application must be present. If Citrix Workspace is not present Endpoint Manager will install it first.
Application dependencies
Now the configuration is ready, and the applications start deploying to the clients. What happens on the client? Well first the Intune Management Extensions is installed on the client. This extension is used for the installation as well as the deployment of custom PowerShell scripts on devices. You can use the extension for troubleshooting purposes. The log file IntuneManagementExtension.log can be found in C:\ProgramData\Microsoft\IntuneManagementExtension\Logs.