In my previous blog I showed how easy it was to package and deploy an application using MSIX and Intune. In this blog I want to show how easy it is to update and application. Applications evolve and time to time they get updated with the latest patches or security updates. To update applications with Intune can be challenging. Sometime you have to create a new deployment of an application. This requires you to first uninstall the application, otherwise you would get conflicts.
So for this blog I have the following situation. I have deployed the Citrix Receiver application to my users. The Citrix receiver was been updated and is now the Citrix Workspace application. I want to remove Citrix Receiver and replace this with the new Citrix Workspace application. Let me show you how easy this process is when you use MSIX.
So I have my test machines on which the Citrix Receiver MSIX is deployed.
The fist step is to create a new MSIX package for the Citrix Workspace application. I wont go over all the steps (check out the previous blog). But here it is important that you name your package the same as the application you want to replace. So if you previously deployed an application with the name CitrixReceiver, create a new package with the name CitrixReceiver. Furthermore it is important that you increment the version of your package.
Update Name and Versions
When your MSIX package is ready and tested, you can upload it to Intune. Simply go to your previous deployment. In my case this was the CitrixReceiver deployment. Select Properties and go to App package File. Here you can select and upload the new version of your application.
Upload new version of your MSIX package
When the application is finished uploading Intune will redeploy the application to your clients.
MSIX updating to Workspace
Citrix Workspace App is finished updating
Recap
I showed you how easy it was for you to update an existing MSIX application with Intune, by simply redeploying it. Knowing how easy your application management can be, I would encourage everyone to give MSIX a try.
I think we can all agree that application deployment is probably the most challenging part of an Intune implementation. The wide variety of Line of Business applications and different installation types can give you sleepless nights. It’s true that Microsoft has made some real improvements in application deployment with the support for most applications extensions. But there are always some applications that simply can’t be deployed with Intune or are very hard to deploy and manage.
With the introduction of MSIX I dare to say that you can now practically deploy any application successfully with Intune. In this blog I describe how you can create and deploy an MSIX package with Microsoft Intune. In this blog I will cover:
Create a Self-Signed Certificate (testing purposes)
Before you can deploy a MSIX package you need a certificate to sign your package. The signing of a package is a required step in the creation of the package. This is necessary because this is the only way you can assure that package is valid and came from a trusted provider. Preferably you should use a Code Signing certificate from a 3rd party provider. For now I use a self-signed certificate so that the deployment can be tested, but for you production environment I wouldn’t recommend this.
To create a self-signed certificate, you can start PowerShell as an administrator from any VM. Enter the following cmd, where you replace <Your Organisation> with a name of your choosing:
To Export the certificate open certmgr, your certificate is located in the Personal Certificates folder. Select the certificate –> all Tasks –> Export. Choose Next –> Yes, Export the private Key –> Choose Next –> For Encryption choose AES265 and enter a Password –> Enter a save location –> and choose Finish. You now have the certificate with a pfx extension.
We also need a certificate with the cer extension, so run the export Wizard again. Select the certificate –> all Tasks –> Export. Choose Next –> No, do not export the private key –> Choose Next –> Enter a save location –> and choose Finish.
You now have the certificate to sign your MSIX package and you have a certificate to distribute it via Intune.
Deploy Certificate Using Intune
Before you can install the MSIX package on any machine the certificate to sign the application must be trusted by the machine. Otherwise the application wont start. To install the certificate on the machine we can use Intune to distribute the certificate.
From the Intune Management Portal go to –> Device Configuration –> Profiles and choose Create Profile. Here you enter the name and description of the Profile. For the platform you choose Windows 10 and later, for Profile type select Trusted certificate. In the new blade you select the .cer certificate that you exported. After you created the Profile you than assign the profile to a group with has a test device in it.
Create a MSIX Package
For this blog I wanted to package an application that I had some trouble with in the past, the Citrix Receiver.
I have copied the Citrix Receiver installation file and the pfx certificate to the packaging VM and have launched the MSIX Packaging Tool. Here I want to create a new package, so I select ‘Application Package’.
Select Create package on this computer and choose Next. The packaging tool will now check some prerequisites and make sure that the drivers are installed.
In the next screen select the installation file. For now, I leave the installer arguments empty. For Signing preference, I select Sign with a certificate. This step is important. If you don’t select a certificate the application won’t be able to install.
Now provide some information for you package. Give your package a Name and a Display name. The Publisher name is provided from the certificate. The display name must be the same as the certificate, if these values don’t match the application won’t install. The installation location is not a mandatory field but is recommended.
By clicking next you will now enter the installation stage. The installation of your application will now start. You can just run through the installation as you normally would. When the installation is completed you can continue by clicking Next.
If the application requires any first launch tasks, they can now be performed otherwise press Next and continue Yes, move on. The package will now be created.
Finally provide a save location for the package and choose Create.
Deploy MSIX with Intune
Now that the MSIX package is ready we can start deploying it with Intune. Simply go to the Intune management portal –> Client apps –> Add App. Here you select Line-of-business app. Here you can upload the MSIX package you created.
When you click the app information blade you can see that most of the information is already filled out with the information from the MSIX package. After adding the app, just wait till the application is uploaded. The final step is to assign the application to a group.
After some time check your test machine to confirm that the application is deployed.
Recap
As you can see the packaging and distribution of an application with MSIX and Intune is really easy. But it doesn’t stop here, after you deployed one version of the application you might want to provide the application with an update. With MSIX this process is even easier. So in my next blog I will show you can can upgrade the Citrix Receiver application to the new Citrix Workspace application!
EDIT okt-2021. Microsoft has made it easier to configure Windows Web sign in. I have created a follow up article Configure Windows 10 Web sign in – 2
With the arrival of Windows 10 1809, Microsoft introduced a new way to sign in to your PC. Besides a pin, password or biometric authentication they introduced Web-sign in . This feature enables Windows logon support for identity provides like SAML. Web sign-in enables you to set multifactor authentication before signing in to Windows. Even though you cannot set the Web-sign-in as the default authentication method yet, I’m sure that this will become possible in the future.
In this
blog I will show you how to enable Web sign-in, using Intune. This is what you
need:
A test device with Windows 10 1809.
The test device needs to be Azure AD Joined.
An Azure AD group with the test device as member.
An Intune license assigned to a user. I’m using a test user with an EMS E5 License, but any Intune license will do.
To enable
Web sign-in you will need to create a Device configuration Profile. So, sign into
the Azure Portal and go to the Intune blade, where you select “Device
Configuration” and “Profiles”.
Click “Create
Profile”. Enter a name and for Platform choose Windows 10 and later. For
Profile Type you will need to select Custom.
At the OMA-URI Settings click add and enter the following values (reference link):
Name: Web Sign In
 OMA-URI: ./Device/Vendor/MSFT/Policy/Config/Authentication/EnableWebSignIn
 Data Type: Integer
 Value: 1
Click OK
and click OK at the OMA-URI settings, finally choose create. The policy is now
created.
Now you
will need to assign the policy to a group with your test device(s).
Testing the
policy
Wait before
the policy is applied to your test machine. This could take a while but try to
reboot your test device occasionally this could help. After you see the policy
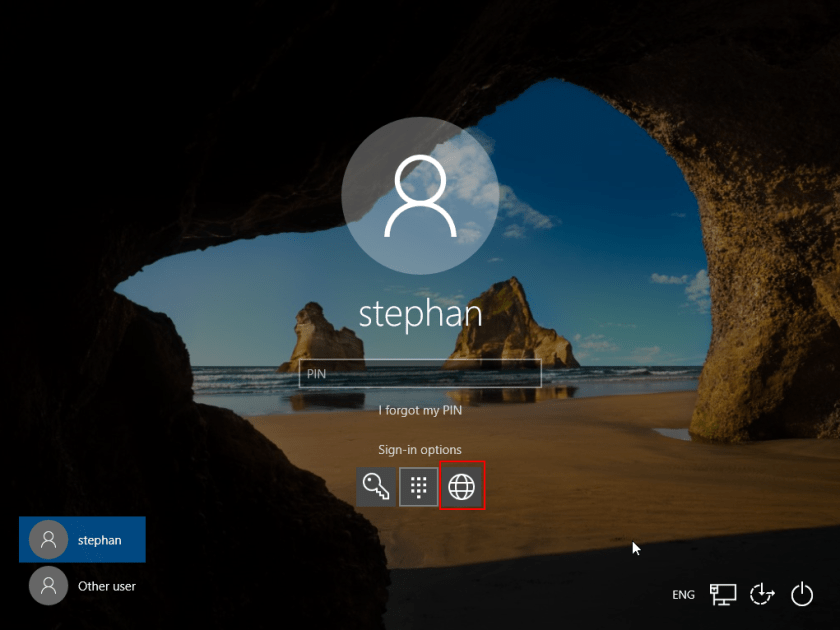
is applied you can go to the logon screen of your device. If you choose Sign-in
options, you should see a new icon for Web sign-in.
Select the
Icon and choose Sign in. This will take you to the web sign-in page of
Microsoft where you need to authenticate with your password. If you require MFA
there will also be an MFA challenge at this point.
When you passes the MFA challenge the user will be signed in.
I think this feature has a lot of potential. I often get the question whether it is possible to enable MFA for Windows. However the feature is not ready yet. I find the sign in process slow if you are used to a pin or facial recognition. Further more Web sign-in is not supported in the Multi Factor Unlock feature with Windows Hello For Business.