
- Starting with Windows 365
- Getting started with Windows 365 Business
- Windows 365 Enterprise – AAD Join
- Windows 365 Enterprise – Hybrid Join
- Windows 365 Enterprise – Custom Images
Windows 365 Enterprise – AAD Join
As we have seen in Getting Started with Windows 365 Business setting up Windows 365 Business is pretty straight forward. With Windows 365 Enterprise you will see you get a lot more options. This makes setting up Windows 365 Enterprise a bit more complicated, because you have more design decisions to make.
One of the decisions you will have to make is how to enroll your Windows 365 clients. You have 2 options. The first option is to hybrid join the devices (see https://learn.microsoft.com/en-us/azure/active-directory/devices/howto-hybrid-azure-ad-join). This means that you join the device to the Azure AD and the Active Directory. This functionality is also possible with normal Windows 10/11 clients. Most often this solution is used in combination with Conditional Access policies, Group policy management or SSO with on premises application. Please note that SSO is also possible to on premises application without hybrid joining the devices. In my experience most applications will SSO without the need of hybrid joining the devices. Accessing file shares and for example shared printers will work fine if you Azure AD join the devices and only sync users between Active Directory and Azure AD with AAD connect without any fancy configurations. That said, it’s always worth testing because it limits the amount of configuration you have to do for SSO. Hybrid joining devices requires extra configuration within AAD connect and line of sight to a domain controller. Only AAD joining does not require any extra configuration besides a sync with AAD connect, which in most scenarios is already present. This means that AAD joining, and Windows 365 Enterprise only requires a network connection and your good to go. Pretty easy ????
So, to demonstrate this we will deploy a Windows 365 Enterprise Azure AD joined device, that will be able to access a file share.
A small overview of my setup in Azure. I have a simple vnet containing 2 VMs, 1 domain controller which is set up to sync identities with AAD connect and a file server. The new Windows 365 machines are being joined to the same network, but in the Windows 365 subnet. In a production environment you could see that the vnet is connect to on premises resources via a vpn or Express Route, or that there is a hub spoke design with multiple vnets.

Azure Network Connection
The first step would be to connect the Windows 365 services to your vnet. In order to do so go to endpoint.microsoft.com and choose devices and Windows 365. There you select Azure network Connection.

On the tab select create and choose Azure AD Join. Enter a name which tells you something about the connection, for example what the vnet is you are connecting to. Select the subscription that has the vnet and select the subnet you want your machines to join to. It’s important that your vnet is in the same region as where you want to deploy your cloud pcs as vnet are bound to a specific region.

Select next and create the connection. Make sure your account has the appropriate permissions on the subscription (Owner) and within Endpoint manager.
Microsoft will start running some checks and if all went well, you will get a checks success status.

Provisioning policies
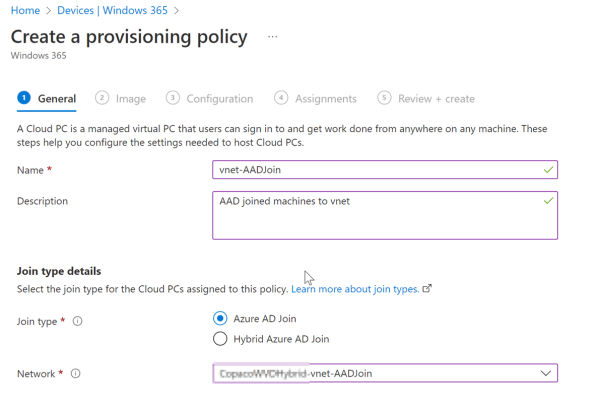
The next step should be creating a Provisioning Policy. These policies determine how the Windows 365 pc should be created. From the Devices section select Provisioning policies and select create policy. Enter a name and description. For Join type make sure to select Azure AD Join. For network it’s important to not choose Microsoft hosted network, this way you won’t be able to integrate with your vnet and the setup is more like the Windows 365 business deployment. So, choose for Azure network connection and select the network connection you just created in the previous step.
At the image tab pick a gallery image, or a custom image if you have one. Check out this article if you’re interested in how to create a custom image. At the configuration tab select the language and region. This will automatically install the required language packs on the machine. For additional services you may choose Windows Autopatch. Windows Autopatch manages updates for you. It’s not really a Window 365 services but you can read more about it in this blog Blog | Get current and stay current with Windows Autopatch | Tech Community (microsoft.com)

Finally assign the policy to a group which contains your users. When you have finished creating the provisioning policy you are basically set. When a user has a valid license (a Windows 365 enterprise and a lisence containing Intune) and is a member of the group which is assign the provisioning policy the cloud pc will be created.
Now I assign the following licenses to my test user in order to start the provisioning of the device. My test user Pluto has 2 licences; a Microsoft 365 E3 and the Windows 365 Enterprise 2 vCPU, 8 GB, 256 GB license.
By assigning the license the provisioning starts. Let this process complete.

Connect to fileserver
Now that the provisioning is ready let’s sign in. As mentioned in the beginning of this article SSO to most of your on-premises resources will work without any extra configuration. So, in my case I have a file server (cluster) which I can connect to via \\filecl02.wvd.local\Bestanden even though I sign into the Windows 365 cloud pc with my Azure AD credentials, pretty cool.

As you can see my cloud pc is only Azure AD joined and not domain joined, but still able to access on-premises resources based on my Active directory permissions.

That sums up this part of the series, please continue reading at the next article, where we Hybrid Join the Windows 365 Enterprise cloud pc.