Windows 365 Enterprise – Hybrid Join

Deploy Windows 365 Enterprise Hybrid with in depth info about hybrid joining devices

Blog series

In the previous article we deployed Windows 365 cloud pc Azure AD only. In this article we will deploy a cloud pc as Hybrid join. So what is hybrid join? Hybrid joining the machine joins the machine to both the Azure AD as well as the Active directory. When would you choose for a hybrid join set up? There are a couple of scenarios when you would want to choose for a hybrid set. For example you are still highly relying on configuring your devices with Group policies, or you have some legacy application that require machine authentication, or you want to use the hybrid join option in your Conditional access policies. All are valid reasons to use hybrid join. In my opinion Azure AD joining is preferable because it eliminates some moving parts in your configuration. These parts can break time to time so not having them will make your life easier.

When you hybrid join a machine the machine is first joined to the Active Directory and then synchronized to Azure AD. This is done via a certificate. AAD connect by default does not synchronize the certificates and therefor you need to adjust AAD connect for hybrid join.

Configure AAD Connect

So, the first step is to configure hybrid Join in AAD connect. Open AAD connect and select Configure device options. You will see an overview screen where you can select Next. Enter your Azure AD global administrator credentials. Select Configure Hybrid Azure AD Join and Next. Then you select Windows 10 or later domain-joined devices and select Next.  You now need to add the SCP configuration. This SCP contains information for the device about where to look for its information as it needs to be joined to Azure. Here you select your forest, authentication service which is most likely Azure Active Directory and select add to enter your enterprise admin credentials. When you hit next some final validations will be done and finally you can choose Configure. Later I will show how to validate the Hybrid Join and what process actually got into motion. Also, if you are planning to deploy the cloud pcs in a specific OU make use the OU is also in sync scope. The OU needs to syn the attributes to Azure AD.

Add the SCP configuration

Azure Network Connection

Now AAD connect is ready you can configure Windows 365 for hybrid join. In order to do so go to endpoint.microsoft.com and choose devices and Windows 365. There you select Azure network Connection.

On the tab select create and choose Hybrid Azure AD Join. Enter a name which tells you something about the connection, for example what the vnet is you are connecting to. Select the subscription that has the vnet and select the subnet you want your machines to join to. It’s important that your vnet is in the same region as where you want to deploy your cloud pcs as vnet are bound to a specific region. Select next and create the connection. Make sure your account has the appropriate permissions on the subscription (Owner) and within Endpoint manager.

Azure network connection

With Hybrid join you need to add additional domain information. Enter the AD DNS name, optional the OU where the devices should be joined into (make sure this OU is syncing to Azure AD), and credentials of a user which has sufficient rights to join multiple pcs.

Azure network connection, domain settings

Microsoft will start running some checks and if all went well, you will get a checks success status. Note that you can have both join types of Azure AD and Hybrid Join pointing to the same vnet and subnet.

Combine join types

Provisioning policies

The next step should be creating a Provisioning Policy. These policies determine how the Windows 365 pc should be created. From the Devices section select Provisioning policies and select create policy. Enter a name and description. For Join type make sure to select Hybrid Azure AD Join. So, choose for Azure network connection and select the hybrid network connection you just created in the previous step.

hybrid join provisioning policy

At the image tab pick a gallery image, or a custom image if you have one. Check this article if you’re interested in how to create a custom image. At the configuration tab select the language and region. This will automatically install the required language packs on the machine. For additional services you may choose Windows Autopatch. Windows Autopatch manages updates for you. It’s not really a Window 365 services but you can read more about it in this blog Blog | Get current and stay current with Windows Autopatch | Tech Community (microsoft.com)

Finally assign the policy to a group which contains your users. When you have finished creating the provisioning policy you are basically set. When a user has a valid license (a Windows 365 enterprise and a license containing Intune) and is a member of the group which is assign the provisioning policy the cloud pc will be created.

Now I assign the following licenses to my test user in order to start the provisioning of the device. My test user Mickey has 2 licenses: a Microsoft 365 E3 and the Windows 365 Enterprise 2 vCPU, 8 GB, 256 GB license.

Hybrid Join

So how is a device hybrid joined? This process is pretty interesting and does not only apply to Windows 365 but also to normally hybrid joining clients. Hybrid joining set a scheduled task in motion. You can find the scheduled task in \Microsoft\Windows\Workplace Join called Automatic-Device-Join, which is triggered from in this case an event Microsoft\Windows\User Device Registration\Admin.  The scheduled task calls upon dsregcmd.exe. One of the first steps in this process is for the computer to create a userCertificate.

User Certificate on computer object

This certificate is then uploaded to Azure AD. This is why you needed to reconfigure AAD connect for this process to work. Without the certificate the device won’t synchronize with AAD.

AAD Connect synced attributes

Sometimes the hybrid join process won’t kick off, you can manually start the process by running the scheduled task (\Microsoft\Windows\Workplace Join\ Automatic-Device-Join) or by running dsregcmd /join from PowerShell.

Also verify that the pc shows up as hybrid joined in the endpoint manager portal.

Hybrid Joined Cloud PC

Windows 365 Enterprise- Custom Images

Step by step creating and capturing a custom image for Windows 365 Enterprise

Blog series

Introduction

Windows 365 Enterprise has a great integration with Endpoint manager. So, your configurations and app deployment should primarily come from there in my opinion. But in some cases, not everything that you need to configure can be (easily) done with Endpoint manager. Sometimes you run into an installation or configuration that is just really hard to accomplish with just Endpoint Manger. An example could be installing language pack (although this process is now included in the provisioning policies). But I’m sure there are other examples out there. This leaves you no other choice than to create your own custom image and use that image to be deployed to your users. In this blog I will walk you through the steps into creating a custom Image.

Prepare your Master Image

First step is to create a new Virtual Machine in Azure. It’s important that for your image you search and select a Windows 10/11 Cloud pc. Other important steps are that you connect your VM to a network you to which you can connect, and you want to disable any boot diagnostics or monitoring options.

Install apps and configurations

Now please consider the following. When you run sysprep the machine won’t be able to start again. This means that if you want to save your master image to make some changes later on you will have to reinstall and configure all your settings again. In order to save your master image for future adjustments is best that you clone your master image VM and sysprep the clone. This way the original master image will be saved for future adjustments. If you want to save your master image vm for future use you can follow along, otherwise skip straight to the sysprep section.

Clone your VM

1 Shutdown your master image vm, until a deallocated state.
2 Create a snapshot of the disk
2a Go to your master image VM
2b Select Disks

Snapshot disk

2c Select the OS disk
2d Select Create Snapshot

Create snapshot of disk

2e Now most settings you can leave as default. I would set storage type to standard HHD

3 Create a new disk from the snapshot
3a Go to your newly created snapshot and select create disk

Create disk from snapshot

3b Here you can also leave all the defaults as is. Make sure that you select the same disk size as you original VM. By default, the size if 128 GB.

Create managed disk

4 Create a new VM from that new disk
4a Go to the newly created disk. From this disk you can now create a new Virtual Machine

Create vm from managed disk

4b Use the same settings as when you created the original Virtual Machine, the only difference should be the image, which should be your created disk.

Sysprepping and capturing your image

Now your master image VM is ready to sysprep. You have created a clone, or you used the original VM the next steps are to sysprep your machine and to create an image from that machine. So, connect to your VM. Navigate to C:\Windows\System32\Sysprep and start sysprep.exe. Use the following setting:

  • System Cleanup Action: Select Enter System Out-of-Box Experience (OOBE) to configure the behavior on startup
  • Select Generalize
  • Shutdown Options: Select Shutdown
Sysprep

After some time, the machine will disconnect. Wait until the machine is in a stopped state in the Azure Portal. When it’s in a stopped state you can select Capture.

On the create image screen it’s important to select No, capture only a managed image. Azure Compute Galleries are not supported. Give your image an easy to recognize name. Also, it’s easy to select Automatically delete this virtual machine after creating the image since the machine won’t be able to function after the sysprep and capture procedure.

Caputre image

When everything went successfully you end up with an image.
Its best to test the image by creating a new VM from this image and validate if the image works as expected.

New image

Add image to Windows 365

After you have validated the image you can add the image to Windows 365. Go to endpoint.microsoft.com and navigate Devices > Windows 365 > Custom images and select Add.

Give your image a name and a version, select the subscription where you saved your image and select the image you created.

Add image

The image will now be uploaded to the Windows 365 services. This process can take a while to complete. After the image has been successfully uploaded you can use the image in your provisioning policy. Instead of choosing a marketplace image your select custom image and you should be able to find your newly uploaded image.

Custom image in provisioning policy

This was the final post of the Windows 365 blog series. I hope the information was useful and you were able to follow the steps.

If you mis any information, please let me know and I will try to incorporate the information into the blog series.

Windows 365 Enterprise – AAD Join

Setting up Windows 365 AAD Join step by step

Windows 365 Enterprise – AAD Join

As we have seen in Getting Started with Windows 365 Business setting up Windows 365 Business is pretty straight forward. With Windows 365 Enterprise you will see you get a lot more options. This makes setting up Windows 365 Enterprise a bit more complicated, because you have more design decisions to make.

One of the decisions you will have to make is how to enroll your Windows 365 clients. You have 2 options. The first option is to hybrid join the devices (see https://learn.microsoft.com/en-us/azure/active-directory/devices/howto-hybrid-azure-ad-join). This means that you join the device to the Azure AD and the Active Directory. This functionality is also possible with normal Windows 10/11 clients. Most often this solution is used in combination with Conditional Access policies, Group policy management or SSO with on premises application. Please note that SSO is also possible to on premises application without hybrid joining the devices. In my experience most applications will SSO without the need of hybrid joining the devices. Accessing file shares and for example shared printers will work fine if you Azure AD join the devices and only sync users between Active Directory and Azure AD with AAD connect without any fancy configurations. That said, it’s always worth testing because it limits the amount of configuration you have to do for SSO. Hybrid joining devices requires extra configuration within AAD connect and line of sight to a domain controller. Only AAD joining does not require any extra configuration besides a sync with AAD connect, which in most scenarios is already present. This means that AAD joining, and Windows 365 Enterprise only requires a network connection and your good to go. Pretty easy ????

So, to demonstrate this we will deploy a Windows 365 Enterprise Azure AD joined device, that will be able to access a file share.

A small overview of my setup in Azure. I have a simple vnet containing 2 VMs, 1 domain controller which is set up to sync identities with AAD connect and a file server. The new Windows 365 machines are being joined to the same network, but in the Windows 365 subnet. In a production environment you could see that the vnet is connect to on premises resources via a vpn or Express Route, or that there is a hub spoke design with multiple vnets.

Test environment setup

Azure Network Connection

The first step would be to connect the Windows 365 services to your vnet. In order to do so go to endpoint.microsoft.com and choose devices and Windows 365. There you select Azure network Connection.

Azure network connection

On the tab select create and choose Azure AD Join. Enter a name which tells you something about the connection, for example what the vnet is you are connecting to. Select the subscription that has the vnet and select the subnet you want your machines to join to. It’s important that your vnet is in the same region as where you want to deploy your cloud pcs as vnet are bound to a specific region.

Network details

Select next and create the connection. Make sure your account has the appropriate permissions on the subscription (Owner) and within Endpoint manager.
Microsoft will start running some checks and if all went well, you will get a checks success status.

Successful network configuration

Provisioning policies

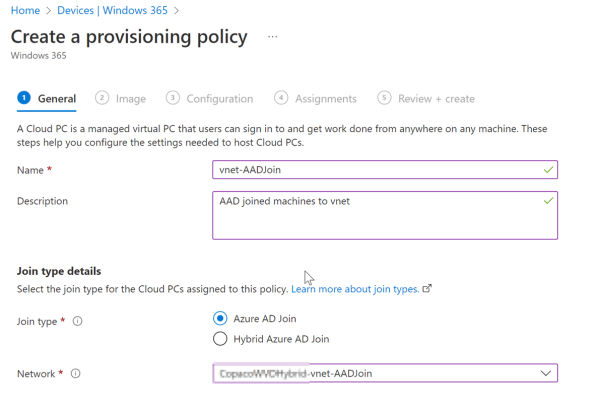
The next step should be creating a Provisioning Policy. These policies determine how the Windows 365 pc should be created. From the Devices section select Provisioning policies and select create policy. Enter a name and description. For Join type make sure to select Azure AD Join. For network it’s important to not choose Microsoft hosted network, this way you won’t be able to integrate with your vnet and the setup is more like the Windows 365 business deployment. So, choose for Azure network connection and select the network connection you just created in the previous step.

Provisioning policy

At the image tab pick a gallery image, or a custom image if you have one. Check out this article if you’re interested in how to create a custom image. At the configuration tab select the language and region. This will automatically install the required language packs on the machine. For additional services you may choose Windows Autopatch. Windows Autopatch manages updates for you. It’s not really a Window 365 services but you can read more about it in this blog Blog | Get current and stay current with Windows Autopatch | Tech Community (microsoft.com)

Enroll device in autopatch

Finally assign the policy to a group which contains your users. When you have finished creating the provisioning policy you are basically set. When a user has a valid license (a Windows 365 enterprise and a lisence containing Intune) and is a member of the group which is assign the provisioning policy the cloud pc will be created.

Now I assign the following licenses to my test user in order to start the provisioning of the device. My test user Pluto  has 2 licences; a Microsoft 365 E3 and the Windows 365 Enterprise 2 vCPU, 8 GB, 256 GB license.

By assigning the license the provisioning starts. Let this process complete.

provisioning finished

Connect to fileserver

Now that the provisioning is ready let’s sign in. As mentioned in the beginning of this article SSO to most of your on-premises resources will work without any extra configuration. So, in my case I have a file server (cluster) which I can connect to via \\filecl02.wvd.local\Bestanden even though I sign into the Windows 365 cloud pc with my Azure AD credentials, pretty cool.

Connect to file server

As you can see my cloud pc is only Azure AD joined and not domain joined, but still able to access on-premises resources based on my Active directory permissions.

AAD Join only

That sums up this part of the series, please continue reading at the next article, where we Hybrid Join the Windows 365 Enterprise cloud pc.

Getting started with Windows 365 Business

Step by step deployment instructions of Windows 365 Business

Please read my introduction blog, Starting with Windows 365 if you are looking for Windows 365 basic information.

Blog series

Windows 365 Business – Prerequisites

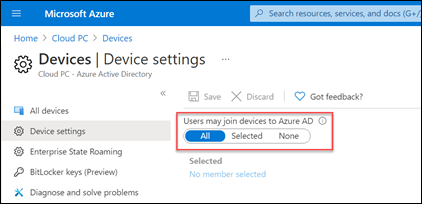
In order for Windows 365 Business to work you will need to enable the ability for users to join devices to the Azure AD. You can enable this by going to portal.azure.com selecting the Azure Active Directory and then Devices and Device settings. Here you can select All, or scope it to a group of users.

Users may join devices to Azure AD

Before assigning any licenses its good to set the organization default settings. Here you can choose whether a user should be a standard user or local administrator, what operation system should be deployed and the language. These settings are only deployed when assigning a new cloud pc. You can also those to enroll the new devices into Microsoft Endpoint Manager, but your user will also need a separate Intune license. You can modify these settings my signing in to https://windows365.microsoft.com/

Update organization settings

Select Update organization setting:

Update organization settings

In my case I also enroll new cloud devices in Endpoint Manager since I have a suitable license.

Assign your user with a license

My test User Goofy is a user who is synced from Active Directory with AAD Connect to Azure AD. You do not need a synchronized user, a cloud only user is also fine. I’m assigning Goofy a Microsoft 365 Business Premium license. This includes Intune so I can manage the device. I’m also assigning the Windows 365 business 2 vCPU, 8 GB, 128 GB license. By assigning the Windows 365 license Microsoft immediately starts provisioning a new cloud pc for the user. This process does take some time to complete. You can monitor this process by selecting the user and by selecting Devices:

Cloud pc is provisioning

After some time you will see that the device is ready for the user to work with:

Cloud PC is ready

Since I also selected the option to enroll the device into Intune you can also find the device there.

Cloud PC in Endpoint manager

End user experience

When the user sings into Windows 365 (microsoft.com) they will see the first launch experience:

The user can then launch the Cloud pc

The user can also use the remote desktop application. If possible, I would recommend using the app, because it has better performance than the browser. The user can download the app from the Microsoft Docs.
Open the application and select subscribe and sign in with your credentials

You can now also use the new Windows 365 app which has been announced at Ingite 2022.

Managing Windows 365 Business

As an administrator you would want to administer the device. You have a couple of options. If you have enrolled the device into Intune then your options are limited. When selecting the user in the windows365.microsoft.com portal you have a couple of options:

Managing the device with Intune

Since the device is enrolled with Intune we can also push configurations to the device. I did notice some differences with enrolling normal clients into Intune. There also seem to be some differences with the Windows 365 Enterprise. When opening the device overview in Intune.

There seems to be no primary or enrolled by users, and the device model is stated Virtual Machine. If you compare this with an Windows 365 Enterprise enrollment you see that the primary user and the device model is stated

The lack of an primary user isn’t really an issue, the reason for this is properly that Microsoft uses a different enrollment process like a build enrollment token to enroll the device. The other difference doesn’t seem big until you want to create custom filter rules Create a filter for your Cloud PCs | Microsoft Learn. This option can be useful when you want to target specific Windows 365 cloud pc’s in your environment. Unfortunately this option is not available.

Otherwise, all options that you can use for managing your devices is also possible with Windows 365 business. You can deploy apps, and configurations to your devices as your company requires.

Starting with Windows 365

Welcome to the blog series around Windows 365. During the series I want to provide you with the necessary information and installation steps to build and configure Windows 365 services. This first post is meant to provide you with some basic information around the Windows 365 services.

What is Windows 365?

Stating the Microsoft documentation:
Windows 365 is a cloud-based service that automatically creates a new type of Windows virtual machine (Cloud PCs) for your end users. Each Cloud PC is assigned to an individual user and is their dedicated Windows device. Windows 365 provides the productivity, security, and collaboration benefits of Microsoft 365.

Windows 365 provides user with a single dedicated virtual machine that users can remotely sign in to.

Windows 365 comes in two flavors: Enterprise and Business. Windows 365 Enterprise is aimed to companies who are already invested in Microsoft’s Endpoint Manager and using Endpoint Manager to deploy and manage their Windows 10/11 devices. This means that if you want to start using Windows 365 Enterprise you will also need a license that includes Intune.

Windows 365 Business is aimed to small companies (up to 300 seats) who just need a pc to work from. This means that a user just gets a cloud pc. You do not need an Intune license. But if you want to manage the device an Intune license is required. Windows 365 Business also does not support joining to a custom (Azure) Vnet. So, if you would like to connect your cloud pcs to your network so they can access a file server for example you won’t be able to do so.

Basically, it comes down to this. If you want to have a quick lightly managed device for your end users, you should go with Windows 365 Business. If you want to have more control, you should go with Windows 365 Enterprise. To see a full comparison, check out the docs from Microsoft Compare Windows 365 Business and Enterprise | Microsoft Learn

Azure virtual Desktop

But then there is also Azure Virtual Desktop, where does this fit in? Because you can also deliver one to one desktop using the AVD technology. AVD is the next step from Windows 365 Enterprise, and it would provide you with maximum flexibility when deploying desktop for your users. Both Windows 365 and AVD make use of some overlapping technology, so they may seem similar but there are major differences. One big difference is that Windows 365 does not support multi session and the billing of AVD is based on usage. Where Windows 365 is a single subscription per user.

Nerdio has created a nice overview

Windows 365 vs. Azure (Windows) Virtual Desktop | Nerdio (getnerdio.com)

Upcoming features

As Im writing these blog series, Microsoft Ignite is happening. This events always leads to new announcements and product updates. Also for Windows 365. Here are my favorite developments:

  • Windows 365 app – Microsoft Store on Windows. With Windows 365 app, you can access your Windows 365 Cloud PC from the taskbar or the Start menu, enjoying a full Windows 11 experience while moving between your local and Cloud PCs. Supported by all Windows 11 devices, the app delivers high-performing and reliable experiences optimized for Microsoft Teams and your other Microsoft 365 apps.
  • Single Sign on – To provide a seamless user experience while also reducing the risk of credential theft in your environment, we will soon be releasing single sign-on features as part of Windows 365. 

Read all the announcements here: What’s new in Windows 365: Microsoft Ignite 2022 edition – Microsoft Community Hub